Showing posts with label Turkey. Show all posts

Wednesday, July 10, 2013

Baked Ziti


This is one of the first dishes I ever learned to make. It's not gourmet, and it's not healthy in any way, but it is a crowd pleaser. Two bags of cheese, three jars of sauce, a whole box of pasta? What's not to love?

Total Prep Time: 10 minutes

Total Cook Time: 50 minutes

Ingredients:


1 box of tubed pasta (I use Rigatoni usually as I find the ridges hold more sauce)
1 package lean ground meat (I use turkey, but if you prefer ground beef, then go for it)
3 jars of pasta sauce (your favorite kind)
2 8 oz packages of shredded mozzarella cheese (I also like the italian cheese blends, but J does not)
Italian seasoning
Salt/pepper to taste

I also use a disposable lasagna pan to make this because scraping the cheese off of my glass baking dish is kind of a pain in the butt. It's $3 that makes my life way easier.

Preheat your oven to 375 degrees. Set your pasta to boil in a large pasta pot with some olive oil in the water to keep the pasta from sticking. You'll want to use a bit more than you may normally use because you really don't want these noodles to stick.

In a non-stick skillet over medium high heat, brown your ground meat. Season with italian seasoning, salt and pepper as you brown.


Once your meat is mostly cooked, drain off the excess liquid/fat that has accumulated in the skillet. Set the meat aside. After the pasta is cooked, drain and let it continue to drain in a colander. In the same pot you cooked your pasta, dump two and a half jars of sauce, and set over medium heat. Season accordingly with the italian seasoning, and add the browned meat.


Let the sauce simmer for about ten minutes. Then, in your baking dish/lasagna pan, spread a thin layer of sauce on the bottom.


Layer a fine layer of shredded cheese over the sauce.


Next, add a layer of noodles.


Repeat the process. When you add the sauce this go-round, be a little more heavy handed. This is where the bulk of the goodies go. 

After you get the second layer of noodles, you'll want to add the rest of your sauce. I typically have run out of the meat sauce at this point, and that's where the extra half of a jar of sauce comes in handy. Also helps get into the corners of the pan. Then, load it up with the rest of the cheese. 


Throw that puppy in the oven at 375 degrees for about ten minutes, just in time for the cheese to get melty. Then, pull it out and sprinkle with italian seasonings. Throw it back in for another ten to fifteen minutes, until it's bubbling and melted. After that, pop on the broiler and WATCH IT LIKE A HAWK. No more than three minutes. Yank it out when it starts to develop delicious brown spots.

Allow to cool/rest/congeal for about five minutes, then serve and enjoy!


Tuesday, January 15, 2013

Italian Turkey Meatballs


Confession: Before I made this meal, I had never, ever, in my life, made a meatball. I've enjoyed many a meatball, but I've always been a bit apprehensive of making them. It seemed overwhelming to try and keep the meat together, in ball form, appropriately seasoned and evenly cooked. But I found out how wrong I've been, and how easy they are to make. Best part about meatballs? As long as you have fresh ground turkey and a fairly well-stocked pantry, you have all the ingredients necessary. And these recipes seem to be pretty flexible!

Total Prep Time: 10 minutes

Total Cook Time: 30 minutes

What you will need:


1 lb ground turkey meat (I used 43% lean since my grocery store does not have 93%, but use whatever mix you prefer)
2 tbsp bread crumbs (I used Italian, but you could use whatever you have on hand, including panko!)
1 egg
1 tsp italian seasonings
1 1/2 tsp minced garlic
1 tsp dijon mustard
1 tsp cumin
salt, pepper and red pepper flakes to taste
1/2 bunch minced fresh parsley (only if you happen to have fresh herbs on hand)
(not pictured: my favorite jar of publix marinara sauce. Use whatever you have on hand).

Preheat your oven to 400 degrees. 

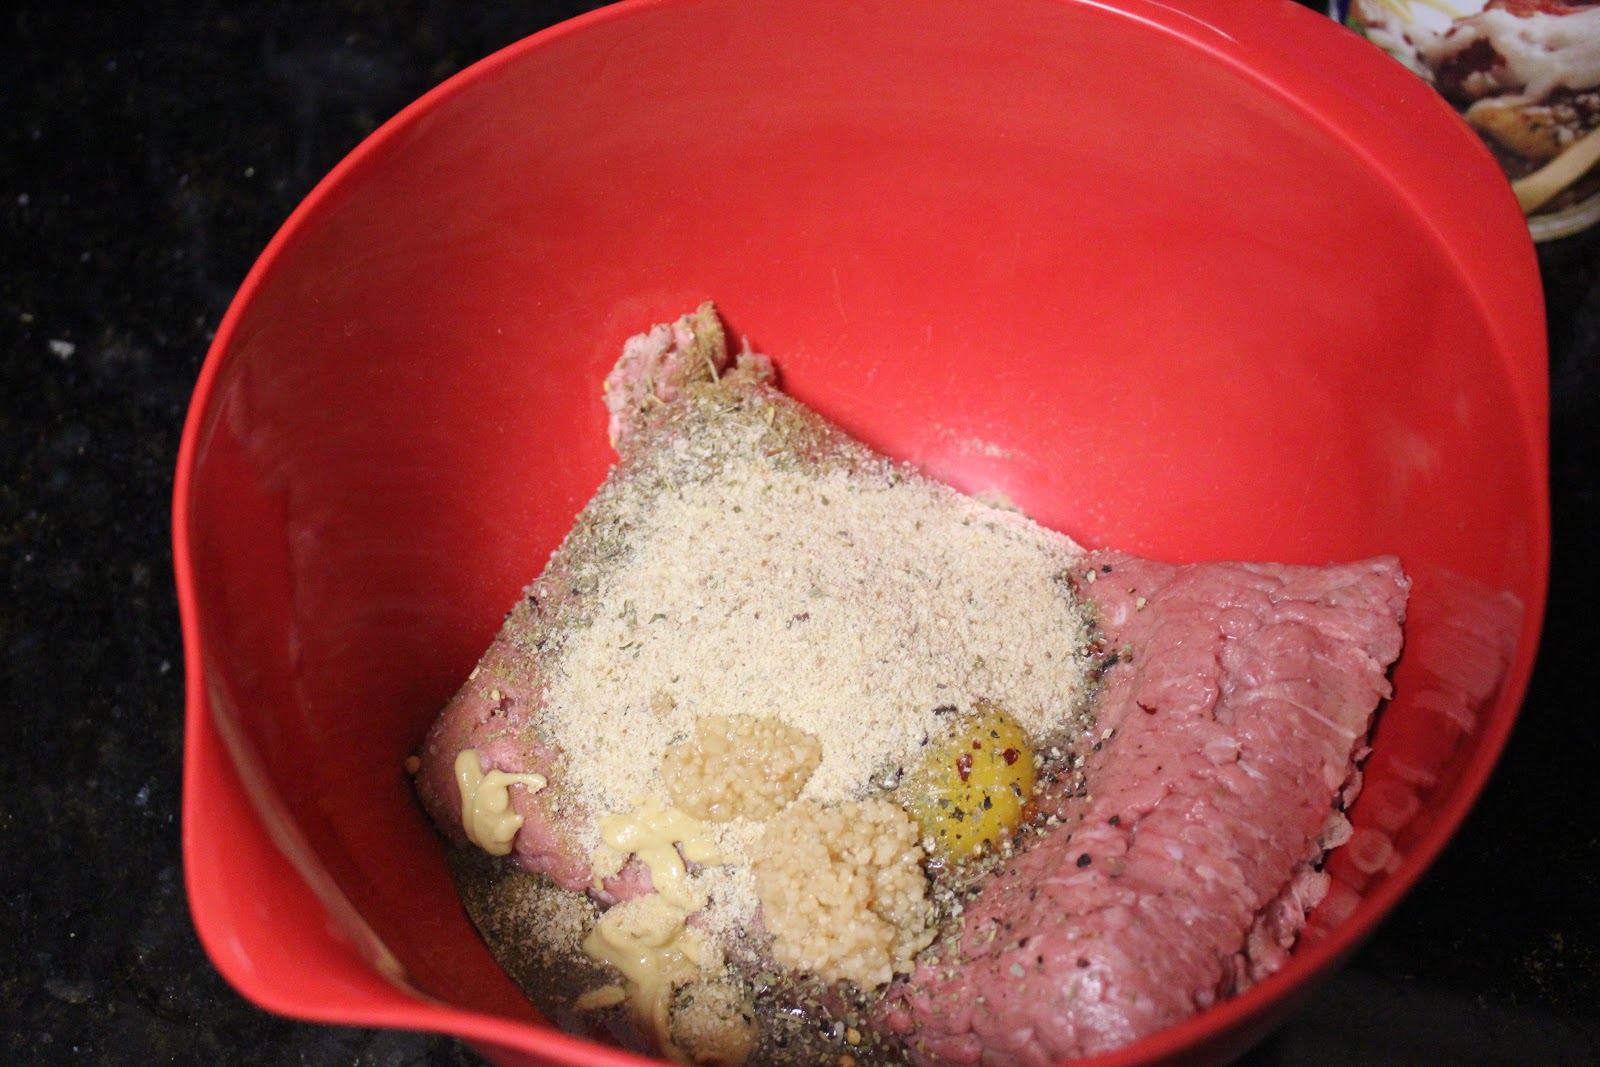
In a large mixing bowl, put your ground meat, and add all dry ingredients. Also add egg, garlic and mustard.


Here comes the fun part. Mix all of this together, well. I tried doing it with a spoon. It didn't work. So I got my hands all up in there. Fact: my refrigerator keeps meat very, very cold.


In an ovenproof casserole dish (sprayed with Pam), place rolled meatballs which are approximately 1-1.5 inches in diameter. Roll the meatballs with the palm of your hand rather than fingertips; I find they bind up a bit better that way.


Bake the meatballs at 400, uncovered, for approximately 15 minutes.


Remove from the oven, and put a non-stick skillet on medium heat on the stove. Place the meatballs (taken out of the casserole dish with a slotted spoon so as to essentially drain them of the fat they've rendered) in the skillet and in a few minutes you will hear them begin to sizzle. Make sure you place them with the browned sides up; essentially, what we are doing here is browning the other sides of the meatballs.


Let the meatballs cook for approximately five minutes, then dump your jar of sauce over them. This is where I really wish that I had a Le Crueset dutch oven, because what I'd really love to do is brown these little suckers in the Le Crueset, pour my sauce in, and then pop it back in the oven...we'll see whether my dreams are recognized from my wedding registry.

Let the meatballs simmer on low heat for approximately ten minutes, then serve and enjoy! These are pretty good on their own (and don't create too much sauce) if you're trying to be low-carb; otherwise, you can serve these with spaghetti for your traditional spaghetti and meatball, or probably could even make meatball subs if you had baguettes and some provolone to melt. Either way...very delicious and easy!


Thursday, October 11, 2012

Thanksgiving Turkey: The Express Version


Thanksgiving is just around the corner, and some of you may have committed to hosting a Thanksgiving dinner without ever having cooked a turkey before. Or perhaps you are going to your relatives' for Thanksgiving and you are slightly sad, since it means that you will not have the leftovers in your refrigerator to make delicious post-Thanksgiving sandwiches (because let's face it, the post-Thanksgiving sandwich is much better than the main event). This is an easy, "express" version of a roasted Thanksgiving turkey that you can totally handle in one afternoon. It's a good "practice turkey" so you can learn the properties of roasting a bird like this and obtaining crispy skin without going through all the hassle of brining and extended prep that all the experts and Williams-Sonoma make you think is necessary.

Disclaimer: This is not a one hour meal. And I won't even promise you that you can do very many other things while it cooks. But you can watch some Bravo TV after it gets in the oven, because if you miss five minutes of the Real Housewives of New Jersey, you will still understand what's going on (hint: they're all mad at each other and screaming "DONT POINT AT ME").

Total Prep Time: 70 minutes

Total Cook Time: for a 10 pound bird, approximately 2.5 hours, but follow the instructions on the packaging and constantly use your meat thermometer

What you will need:


10 lb fresh turkey (fresh is very important. Fresh is VERY IMPORTANT. Never use frozen).
1 stick of butter (or margarine, if you're going the kosher route)
1 leek
Rosemary, Sage, Thyme (really whatever fresh herbs you have in your house will work)
Sea salt and black pepper
A bulb baster
A roasting pan with a rack inserted--very important and key for crispy skin
Kitchen twine if your fresh turkey doesn't already come with it's legs tucked

If you are going to make gravy and you want to do it the fast and lazy way, you will also need:

Williams Sonoma Gravy Base. It is the best, easiest gravy in the world. No messing around with flour and roux and whatnot. 
Milk
Apple cider vinegar
dried italian seasoning
Giblets and neck from fresh turkey

Okay, first thing's first is prepping your fresh turkey. You will take it out of the plastic, and then you must remove the giblets and neck. Typically, the neck is in the big main cavity, and the giblets are wrapped in paper and tucked under the fold of skin in the front of the bird. put these items in a medium sized saucepan, fill with enough water to cover them, and add a splash of apple cider vinegar and some italian seasonings, then set on a low-medium heat to simmer. It should simmer for as long as it takes the turkey to roast--just stir every now and then, and if the water starts to get too low, add some more.

Rinse the bird with cold water and drain. Pat it dry with paper towels, and then put it on the roasting rack to come closer to room temperature for about 45-60 minutes. You can cover it lightly with a papertowel or a clean dishcloth.


While the bird is coming to room temperature, put a stick of butter in a bowl to soften. Take your leeks, and make sure you wash them well as there is a lot of dirt and grit that gets down in the leeks. Then chop up the white part of your leeks into small pieces.


Chop up some of the other herbs you happen to have laying around. There are really no exact measurements, just a small handful of each.

Mash all of the herbs and leeks together in the softened butter so you have an herb butter spread.


Preheat your oven to 400 degrees.

When the turkey is up to room temperature or slightly below, salt and pepper it on all sides, in between the wings and the body, and down into the cavity and the neck (underneath the skin flap). Then, take the the herb butter and with your hands, give the turkey a nice massage. Start by lifting the skin and separating it from the breast and in the neck cavity, and rub some butter in there between the skin and the flesh. Then, give it an all over massage and leave some lumps on top and in the wing and thigh area.


As you see above, I always start cooking my turkey with the breast side down, and I blast it at 400 for about 30-40 minutes (when it's this small--it'll get more time if it's a bigger bird). Why? The thighs are always the last thing to cook, and if you're not careful, the skin on the breast will burn and the breast meat will dry out. This prevents all of that from happening. 


After about 35 minutes, the bottom started to crisp up a little bit, and the thighs were cooking nicely. Flip the bird with turkey lifters if you happen to have them; otherwise, I used two serving forks and did an "over and up" type of flip. Whatever you do, don't drop it on the floor.


See? The other side is not browned yet, but we know it's starting to cook.

Reduce the heat in the oven to 325, and pop it back in. You should be timing about 12 minutes per pound (we got a jump start on the cooking process with the 400 degrees). My general rule is that I set the timer for every 20 minutes, because that's how frequently I baste. I really believe that frequent basting is the key to success with turkey. When you baste, you can lift the turkey up and tilt it a little bit, so that the juices run out of the cavity into the pan. 

After an hour, I check the temperature in the thickest parts to make sure we're on the right track, and that also helps me gauge how much longer the turkey actually will need to cook.

So the key to making sure that your turkey does not dry out is obviously, not overcooking it. I know that we are all paranoid about undercooked poultry because really, who wants salmonella, but overcooking turkey is an awful thing to do. That's why you have to take it's temperature frequently, especially when you're getting close to 165. 165 is the ideal temperature for the thickest part of the meat. You don't want to go too many degrees over that because it will continue to cook when you bring it out of the oven.


Mmmmm, doesn't it look good? Leave it in the roasting rack and LIGHTLY tent with tin foil. Make sure there is plenty of room for some of the steam to escape because the delightfully crackly, crispy skin you have achieved will wilt and turn rubbery and flabby if you steam it. Let it sit there for about 15-20 minutes while you make the gravy.

In order to make your gravy, remove the giblets and neck from the heat and drain. Chop the giblets into small pieces, and then pull the meat off of the neck. Discard the neck bone. Make the gravy according to the directions on the jar of Williams Sonoma gravy prep (it basically involves pouring the gravy base and equal parts milk into a saucepan and whisking on medium heat). Dump the giblets and meat into the gravy to make it tasty. For extra taste and to achieve a better consistency, go scoop out some of the drippings from the bottom of the roasting pan (I honestly just use the bulb baster and run it across the kitchen like a madwoman) and mix into the gravy. 

After all that is done, your turkey will have sufficiently rested, so carve and enjoy!!! Don't ask me how to carve, by the way....I do it lord of the flies style after about three slices.

Thursday, September 13, 2012

"Mexican" Stuffed Cubanelle Peppers


I'll be honest. There was no way to plate this one prettily. And I bet that any person of Mexican heritage would probably hate me for calling this a Mexican dish, hence the quotation marks. But I will tell you that it's good, and when your vegetable delivery includes several large cubanelle peppers, it's time to get creative. This is a surprisingly filling dish, and pairs nicely with either a tomato, avocado & feta salad, black bean and corn salad, or some tortilla chips and guacamole.

Total Prep Time: 30-40 minutes

Total Cook Time: 10-20 minutes

What you will need:


3/4 lb of ground turkey meat (in my grocery store, this only comes in packages of approximately 1.3 lbs--I used the remainder of the meat to make a small batch of spaghetti sauce at the same time I cooked this dish)
3-4 cubanelle peppers (if you are in a part of the country where they have them fresh, poblanos work too)
1/2 cup uncooked rice (you can use brown or white)
1/4 white or yellow onion
1/2 tbsp of olive oil (not pictured)
garlic salt
cumin
Enchilada Sauce (I used a packaged sauce that was very low cal/low sodium and it wasn't bad)
Four cheese mexican blend shredded cheese
1 lime
a handful of chopped cilantro

Preheat your oven to 400.

First step: start cooking your rice. The general rule of thumb with rice is that you want to add two parts water for 1 part rice. So if you have 1/2 cup rice, then you will cook it with 1 cup of water. Make sure you rinse the rice first in cold water--it makes a world of difference in the texture of your rice after it's done cooking. I throw some margarine in with my rice as well, just a small bit, which helps prevent it from sticking. Rice is low maintenance--pretty much put it in the pot and leave it well enough alone.

Next up, dice your onion. You will only want to use about 1/4 of a yellow or white onion. Then, heat your olive oil in a medium skillet (10 or 12 inches) on a medium high heat. Sautee your onions for a few minutes, until they become translucent.


Next step will be to cook up your ground meat. I buy the 43% fat ground turkey meat. Put it in the same skillet as your onions are cooking, and use a wooden spatula to break it up into very small pieces as it cooks. You do not want huge chunks of meat here. Add in a few good shakes of cumin and garlic salt to season the meat as it cooks.


While the meat is cooking, turn your attention back to the peppers. You will want to halve them length-wise, and de-seed/vein them.


Turn your attention back to the stove. By now your meat should have cooked, and there may be some fat which has liquefied in the pan. Drain off the excess fat in the sink, but do not dump all of the meat into a colander to do so, as we are going to continue to use the skillet. Just tip it if possible and try and get as much of the fat out of the pan as possible.

Reduce the heat on the stove to medium, and add in your rice. Mix the rice, meat and onions together, adding additional seasoning if you find it needs a bit more taste. Let these flavors meld together on a low heat. Add in a small bunch of chopped cilantro if you like the taste of cilantro. You can also add a pinch of your cheese blend here to make the rice a bit ooey gooey.


Place the halved cubanelles into a glass baking dish. They should be snug.


Spoon the meat and rice mixture into the cubanelles. Try and fill them as much as possible, using a spoon to press down a bit to get the mixture down into the deeper parts of the pepper. 


Pour your enchilada sauce over the peppers, and top generously with mexican blend cheese.


Place in your 400 degree oven, and let it bake for approximately 15 minutes, or until the cheese is melty and the sauce is slightly bubbling. Then, flip the broiler on and watch it until the cheese starts to brown. Then, serve and enjoy!!!